Sideloading UWP apps on Windows 10
I’ve helped several clients build UWP apps and games and one thing that is repeatedly asked is for the possibility to install test versions of apps without the need of downloading from Store. This is not a forgotten feature at all in the Microsoft ecosystem and something that works just fine, however it takes some manual steps and this post is intended to guide you through those steps.
Prerequisites
I presume that you already have a device with Windows 10, and most likely also been provided with a .zip file containing the packaged application you want to install. Usually this means that you have a couple of files bundled together and the listing of these files might looks something like this:
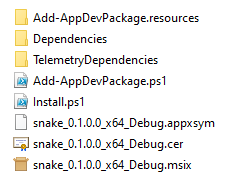
The most important files for this guides purpose is the Install.ps1 and the snake_0.1.0.0_x64_Debug.msix (naturally the name of this file will be different and based on your own apps naming scheme). Also please be aware that the extension of the latter file might be .appx which is the older extension but for this guide it doesn’t matter.
Step 1 - Enabled developer mode
Before we can install anything on a computer, this computer needs to enabled “Developer Mode”. This can be done by opening the Settings and by selecting the Update & Security section. In the menu to the left you will now find an alternative For developers which you click. The simply select the radio button for Developer mode. You might have to restart your computer after this has been changed, keep that in mind.
Step 2 - Install with PowerShell
Now you are going to use the PowerShell console to install the package. Simply type PowerShell in the search bar in the Windows taskbar. Select the Windows PowerShell application. Now you need to change your directory to the place where you have downloaded the package to install. If you know the full path to the directory simply use the command cd <full path here>. An example could be if I have downloaded the files to c:\temp\snake I would type cd c:\temp\snake.
Then run the provided Install.ps1 script by typing .\Install.ps1.
This script will prepare you machine by first installing the signing certificate which also comes with the provided package above. Simply press Enter on you keyboard and answer Yes on the Administrative dialog, initiating an adminstrative session to register this certificate. Then enter the key Y to actually install the certificate, press Enter again.
Now the signing certificate will be installed and then the script will continue to install the .appx or .msix package. Hopefully you will see the Success: Your app was successfully installed message and you will then be able to find the application in your Start Menu.
Good Luck!